Blogs can be a very marketable and very profitable tool if used correctly. Profiting from blogs is just a matter of grabbing the attention of an audience and not doing any actual salesmen selling. In this article you will learn the 13 most essential steps to successful blogging.
1) Where to start?
You should begin your blog with a free blog hosting service such as Journal Home or Blogger. Starting with a free blog hosting service allows you to begin blogging instantly without having any advance knowledge of scripts, hosting, or programming. It allows you to focus on your content and not the internal maintenance of the blog. The best benefit of starting with a free service is, in the case your blog doesn't become successful you do not lose any money or are you left holding the bill. The great thing about a blog is that they are organized in chronological order, your latest entry is displayed first. When your blog traffic grows greatly and you are ready to upgrade to your own domain then you can simply make your last blog entry the announcement of your "move". Simply add a last entry stating that your blog has "moved" and type the new blog URL address. Which directs visitors to your new blog site, keeping your following, without a major inconvenience to anyone. Upgrade as you need to...but only when you need to!
2) Niche
A niche is a targeted product, service, or topic. You should first decide on a product, service, or topic which interest you. Choose an area which you can enthusiastically write about on a daily basis. You can use keyword research services like Google Zeitgeist or Yahoo! Buzz Index to find popular searched topics. It does NOT matter if your topic is popular as long as there is a audience for your topic and the topic is precisely focused then your blog should be successful. Anything can be considered a niche as long as it has a target audience no matter how large or how small the audience is. A blog about your cat can be a niche or a blog about the species of the cat family can be a larger niche market, if there are people who are interested in hearing about your cat or the species of the cat family...you can even choose to build your audience for a market which an audience does not exist, but first you must build your blog.
3) Update Daily (nothing less)
This step is a must and not a suggestion. Updating your blog daily not only keeps your blog more interesting to readers, but it also gives your blog fresh content on a day to day making it more appealing to search engines. Not updating your blog on an occasional holiday or one day here and there is understandable to most, but missing days at a time or weeks is unacceptable and will most likely result in your blog being unsuccessful. To keep your blog traffic and retain your visitors interest it is a must to update your blog daily with multiple entries. You should try to update your blog everyday with at least 3 or more daily entries. The best way to accomplish this is to set aside 1-2 hours a day for tending to your blog and adding new entries. It may even be wise to schedule a set time which you dedicate to your blog each day. Give yourself work hours and treat your blog as a job, what happens if you don't come to work for days or weeks...you lose money or worse you get fired! Same applies here...if you don't update your blog for days or weeks you'll lose visitors.
4) Traffic
It's no secret. You must have traffic to profit from blogs. There are numerous ways to build traffic. Paid advertising, free advertising, viral marketing, search engine marketing, RSS/XML feeds, and word-of-mouth. You should always use your blog URL address in the signature of your email, forum discussions, message boards, or any other communication media. You should submit your blog URL address to search engines and blog directories. You should submit your RSS/XML URL feed to blog ping services like Technorati, Ping-O-Matic, and Blogdigger. You should confidently share your blog with family, friends, co-workers, associates, and business professionals when it relates. Many blogs can be considered as a collection of articles, for this purpose you should submit your blog entries (those that are valuable and lengthy articles) to content syndicators like GoArticles.com or ArticleCity.com. Once submitted your articles can be picked up and published by others. The trick is to make sure you include your Blog URL address in the "About the Author" passage. What this does is create link popularity and backlinks for your blog, when someone picks up your article from the syndication then publish the article on their website the "About the Author" passage is included with each publication and the link you included is followed, crawled, and indexed by search engines. Imagine if your article is popular enough or controversial enough to produce 10,000 publications across the web. The search engines is bound to find your site in no time with that many publications and credit you a authority on the topic, in return increasing your rank on search engines. The small effort of writing a well written article is rewarding. You should try to write at least 1 full length article every week for syndication and submit your article to at least 10 article syndicators.
5) Track Your Blog
How do you know if your blog has traffic? Just because no one is leaving comments doesn't mean your blog isn't growing. Many visitors do not leave comments but they are returning visitors. I know it sounds crazy but with blogs people are more interested in what "you" have to say! Many visitors do not comment their 1st, 2nd, or 3rd time. Some do not comment at all, but are active daily visitors.
Tracking your blog does not have to be overly sophisticated usually a simple free page counter like StatCounter.com or Active Meter will do the trick. Install (copy/paste) the code into the html of your blog template and start tracking your visitors. Its better to use a service which gives you advanced traffic analysis, such as keyword tracking information, referral information, and search engine information. Visitors, returning visitors, and unique visitors should be standard for any page counter service you choose.
6) Listen to Your Audience
When using the proper page counter you should begin to see how others are finding your blog and if through search engines then which keywords are being used to find your blog. If constantly your blog is being found by 1 or more keywords then focus your blog around those keywords to make it even more powerful. When writing entry titles and entries use the keywords as often as possible while keeping the blog legible and interesting.
7) Multiple blogs
Use multiple blogging accounts to attract more people. This means you should have a blog with JournalHome.com, Blogger.com, LiveJournal.com, Blog-City.com, tBlogs.com, etc. The more blog accounts the better. You can copy/paste from 1 blog to all others. Having different blog accounts is like having a publication in different newspapers. This enables you to attract more visitors and this also increases the chance that 1 of your blogs will be in the search engine results for your focused keywords.
8) Short & Concise
Aside from the lengthy article a week for syndication and publication your blog entries should be short & concise (if you can help it). Sometimes there are exceptions to the rule and you have no choice but to blog lengthy entries, but try to avoid this as much as possible. You do not want your blog entries to become hours of reading. Visitors like to easily find information and skim through your entries. It is good to be detailed and provide useful information, but do not include useless information or run away sentences that veer away from your topic.
9) Digital Art
Try to include non-advertising graphics, pictures, photos, and art in your blog entries. Not too much. Once a week is fine. Graphics can sometimes bring your blog to life. Of course, the content of the blog is the most important aspect and you do not want to overshadow your content with graphics, but displaying graphics can add a bit of spice to the blog. Be choosy about your graphics and make sure they fit your entry topic. You should add content with the graphic, at least a caption. Original graphics, photos, pictures, and art is recommended.
10) Keep it Personal
A blog is most successful when it is kept personal. Try to include personal experiences which relates to the topic of your blog entry. Stay away from the business style of writing. Write with a more personal style and use first-person narratives. Do not write any of your entries as sales letters, instead share product reviews and personal endeavors.
11) Interact With Your Visitors
You now have the traffic you deserve. You should begin interacting with your visitors. Create a regular theme such as: "Monday Money Tip" or "Picture of the Week" which entices your readers to look forward to each week.
Give your readers advance notice about a product, service, or topic which you are going to review and then talk about later. If the President was scheduled to give a speech then in your blog you should state that you "will discuss the speech and give your opinion after the speech airs. Comments will be appreciated".
Try your best to find exclusive information that not many have. Do not disclose any confidential or secret information which is deemed illegal or can potentially get you into trouble, but try to get the scoop before everyone else does. Such as: If your blog was about Paris Hilton (the socialite) and you had a blog entry about "Paris Hilton Getting Married" then it would be interesting to your readers if you had a actual picture of Paris Hilton engagement ring. Give your best effort to dig and search the internet for exclusive information and you will possibly come up with something useful. Your readers will appreciate this and they show their appreciation through word-of-mouth referrals. Imagine how many readers will tell their friends, family, and others about information they only can find at your blog.
12) Make Money
Once your blog has gained some real momentum and your blog traffic is increasing then it is time to start thinking about turning your traffic into profit. You should use contextual advertising, like Google Adsense or Chitika. Contextual advertising is usually text links which use the content of your blog to publish targeted ads on your blog. The payout is usually based on a pay-per-click model, meaning for ever click an ad receives you are paid a small percentage of the profits. In addition to contextual advertising it is good to also use graphical advertising such as: BlogAds.com, Amazon.com, MammaMedia, or General Sponsored Advertising.
13) You're a Professional
You're a professional now! What are you still doing with that free blog hosting service? It is time to upgrade to a domain hosted solution. You need to get a web host and choose a domain name for your blog then check its availability. Select the blogging software you wish to use, such as: Squarespace.com, WordPress.org, MovableType.org, etc. When you have your new blog domain setup and ready for traffic then it is time for you to announce your move on all your previous blog accounts. Your last entry to the blog should be a "move" announcement. The title should be "Moved" and the blog entry should state something like "Old Blog has been moved to New Blog please follow and bookmark this link for future reference: http://www.YourNewBlogDomainName.com". This way all returning visitors and new readers should not have any problem finding your new blog domain.
At the level of a professional blogger you may want to team up with 1 or more other bloggers. This will create a more interesting and more powerful blog. The old saying "two heads is better than one", more authors mean more advertising and exposure because each author will have a vested interest in the blog. The idea of a team blog is to make it profitable and rewarding for all authors, while continuing to target the blog topic and keeping the blog interesting for visitors.
Following these blogging techniques should make your blogging experience much more rewarding. There is no guarantee that your blog will become popular or a household name, but the effort should at least put you one step closer. Making money online is not an overnight experience like many may think, but making money online is definitely a foreseeable possibility. As well, growing popularity on the web is not an overnight experience, but through time, dedication, and persistence you will be rewarded with all the royalties of blogging.
About the Author
Ant Onaf is the owner and founder of www.JournalHome.com He is an online internet marketer, content writer, and IT consultant. Ant Onaf has years of IT-related experience and Internet-related experience. His ingenuity, dedication, and passion for technology, internet marketing, & writing have made him a monumental icon in the World Wide Web. His blog can be visited at http://www.journalhome.com/AntOnaf
|


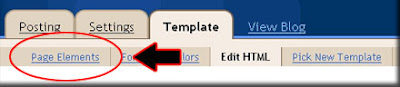

 Blog tutorial


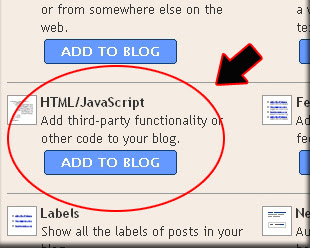
 , and if the image will show at sidebar, please choose "HTML/Javascript"